Voice Interface – Phrase Processor

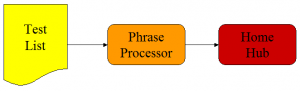
As the name suggests, the Phrase Processor processes a phrase and returns a response. If the phrase is a call to action, then the action is performed and a confirmation forms the response. Here is a block diagram.

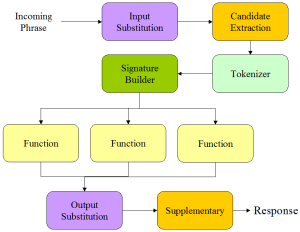
The real work is performed by the Functions, which talk to the hub to find out the current kitchen temperature, or to switch on the heating, etc.

The Input Substitution converts everyday terms into terms the hub will understand e.g. rain > precipitation, etc.  Similarly, the Output Substitution can change words that are not pronounced well by the Text-To-Speech component e.g. Beaufort > Bofort.

Candidate Extraction involves splitting a phrase into likely candidate terms. For example, we may have a zone called Bedroom 1, so if we were to utter the phrase ‘what is the humidity in bedroom 1‘, our tokenizer might spot humidity as a measurand, but might not recognise bedroom 1 as a zone. By using a word count of 2, we can extract the following candidate terms: what, what is, is the, .. , bedroom 1 and we have a fighting chance our zone will be spotted.

The Tokenizer takes candidate terms and looks them up in lists of terms. Term lists are read from the hub: sensor names, zone names, actuator names, measurands, etc. or derived from pre-configured command lists. It then generates a set of tokens which provides automatic de-duplication.

The Signature Builder converts the set of tokens into an ordered function signature and marshals the parameters.  So taking our example from above, the tokenizer would have generated a humidity measurand token and bedroom-1 zone token. These would be converted into the measurand_zone( x, y ) function signature, and the function would be called. This approach allows us to utter the reverse phrase ‘bedroom 1 humidity’ and still have it handled by the same function.

Specific sensors can be configured to report supplementary information for certain value ranges. For example, wind speed in mph can be supplemented with a familiar description e.g. 40 mph plus gale, 8 on the Beaufort scale.

This covers the structure of the Phrase Processor. In the next post we will address minor changes we need to make to the home-hub to be able to implement the REST interface.

Voice Interface – Introduction

If you were lucky enough to get hold of the Google Voice AIY Kit, then this series of posts will be of interest. They provide details for a voice controlled interface to the home hub, enabling you to get sensor readings and control actuators using voice commands.

I have implemented a system that runs on a separate raspberry pi, and queries the home hub using a new REST interface. Having experimented briefly with the Google software, I did not feel it was easy to adapt to my requirements, so this solution only uses the Google hardware. The software is a mix of components selected for the task. The design goal is to have a system that can work out-of-the-box with any home-hub installation, irrespective of what zones, sensors and actuators are installed.

Part way into this project I realised that testing voice assistants was particularly difficult.  Interpreting voice commands is not an exact science, and this causes frustration when you are designing new software.  For this reason I have implemented an architecture that aims to make this less problematic.

The first stage involves creating a list of the voice commands you want to process. These are fed directly into the phrase processor, and the response is displayed. The list can be updated with alternative phrases that you really want your hub to understand, while the configuration is adjusted to make them understood.

When you have your Phrase Processor suitably equipped to handle all the voice commands, you can move on to stage 2.

Now the Speech Recogniser is brought into play, and the test list is read out.  What we would hope is that our voice commands are still obeyed correctly, but any discrepancies at this stage will be solely down to failure of the Speech Recogniser.

In the next post I will examine the Phrase Processor in more detail.

Home Hub Sensors – Next Steps

Having completed all the milestones in the project plan, you should have a functioning home hub, with the knowledge to customise and configure it to meet your own requirements.

What I would like to do now is consider some more advanced topics and modules that will greatly add to the value of the hub. The first area to consider is sensors. We have deployed the AM2302 family successfully, but there is a limitation in terms of cable distance.  This could be a showstopper, preventing the hub design from being usable in your property. I want to describe three solutions, each being applicable to progressively longer distances between hub and sensor, and each having advantages and disadvantages. Here is a table which enables the comparison:

Sensor Type Max Distance Feature Summary
AM2302 Family4-5m* Cheap
* Single Pin
BME28010-15m* Cheap
* Complex electronics
* Pi only has 1 serial port
Slave Hub15-25m* Cheap
* Complex configuration
Remote Meteorology10-100km* Free
* Not locally representative

From this table you will be able to determine which approach best meets your requirements.

Having this design operational in my house for a number of months I have learnt some lessons. The Raspberry Pi is a fantastic device for hosting this application, but its Achilles heel is the SD card. Perhaps it’s the number of writes being made by the database and the logging. For this reason I added a USB hard disk to my master hub and the reliability has greatly increased. I followed this excellent walk through.

First up, I will describe the Slave Hub solution, as this builds on the work already done.

Design – Database Schema

It’s worth stepping back at this point to take a look at the database schema, and highlight some of the key tables.

Zone – a zone is a physical sub-space within the area being monitored. Typically a room: Kitchen, Bathroom, etc. but can represent larger spaces such as Outside or Locality. Zones have x, y, z co-ordinates which enable the website to display values overlayed on a floor-plan. Sensors, Actuators and Impulses are all associated with a Zone.

Measurand – a measurand is a physical quantity to be measured e.g. Temperature, Relative Humidity, etc. Sensors are associated with a Measurand.

Sensor holds the key data for each sensor. There is no Sensor Type, but the SensorFunction column effectively has a pointer to the code which handles the reading.

The Actuator table keeps track of the hub outputs such as fan relays, indicators, etc.

Sample is where current values are logged, which becomes the source for graphs on the website.

The EventQueue is important, because it queues events such as a threshold being reached or an impulse from the occupant, until they can be processed by the Rules Engine.

In the next post we will test that our controller can access the database.

Conceptual Design

The high-level design is divided into 3 blocks: the controller, database and website.

The benefit of this arrangement is that there is a clear separation of duties between the controller and the website. I exploited this opportunity to code them in different languages: python for the controller and php for the website. This allows each component to be coded in the language best suited to its needs, with no compromises.