
From the controller’s perspective, driving actuators is simple a matter of translating the state recorded in the database, into a value on a designated GPIO pin. The hub software for actuators uses similar principals to that for the sensors, allowing for future expansion, but currently only supports the simple_on_off function.
Use the following command to download the python files:
wget -nH -x --cut-dirs=3 -P /usr/local/bin/code/controller/ -i /usr/local/bin/code/controller/manifest3.txt http://www.warrensoft.co.uk/home-hub/manifests/controller/manifest3.txt
Edit main_sched.py and uncomment the actuators import on line 29 and the call to process_actuators on line 65, as we did for the sampler. While you are here you can also enable the timers facility, lines 30 and 87.
Restart the controller.
Obtain the following website files for managing actuators:
wget -nH --cut-dirs=4 --reject "index.html*" -P /var/www/html/ -i /var/www/html/manifest5.txt http://www.warrensoft.co.uk/home-hub/manifests/website/manifest5.txt
There is one actuator already configured in the skeleton database, assigned to GPIO BCM Pin 2 (Header Pin 3), but disabled. Use the Organisation menu option to edit this actuator and enable it. It should then appear on the Actuators page.
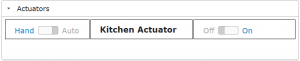
Actuators can be set to Hand or Auto. When in Hand, actuators can only be turned on or off by the user via the website. The hub controller will not be allowed to override this. When in Auto, actuators are solely controlled by the hub controller, and cannot be remotely controlled.
The skeleton actuator should already be in Hand, so you should be able to switch it on and off via the website. When we implement actions later we will put the actuator in Auto to pass control to the hub.
Actuator Timers are associated with each actuator. If you leave the actuator on for few minutes, you will see the on-time displayed. Similarly, if you leave the actuator off for a while you will see the off-time displayed. This is useful information, but more importantly, we can use the on-time and off-time in our Conditions. More on that in a later post.
So things are going swimmingly! We have remote control of a relay, which could be used to turn on any gadgets in the home. Now a slight issue. The relay module I have been using for testing is active-high, whereas the majority of dual/multiple units are active-low. The actuator code is currently programmed for active-high relays.
Which is best? Well the market appears to be favouring active-high, and they have the advantage that should your pi controller be rebooted, relays that are off stay off. This is an important consideration.
So what can we do? Well, it is a trivial exercise to modify simple_on_off.py to change the operation, or you could clone the function into active_high_on_off.py, or you could pass an additional parameter. These changes are easily applied with the extensible software structure we have built.
In the next post we will look at Conditions.