In a previous post we developed a simple api facility for home-hub slaves to enable remote control. The voice interface will use this api for controlling actuators, but it requires a much richer interface to provide a full interactive voice service.
The following instructions will detail how to modify your home-hub to add a full REST api. This will allow us to read data from any table or view in the hub’s database.
Our REST commands will be of the form:
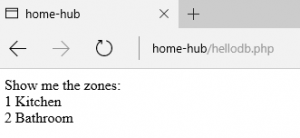
http://home-hub/rest/zones
Normally, the apache web server would throw a page not found error, but with some additional configuration we can direct all such requests to a specific service page.
The first step is to enable the apache rewrite module:
sudo a2enmod rewrite
Then we need to edit the configuration:
sudo nano /etc/apache2/apache2.conf
and find the document root spec:
<Directory /var/www/>
 Options Indexes FollowSymLinks
 AllowOverride None
 Require all granted
</Directory>
and change AllowOverride from None to All.
Restart apache…
sudo service apache2 restart
Then we can add the following .htaccess file to our document root at /var/www:
<IfModule mod_rewrite.c>
 RewriteEngine On
 RewriteBase /
 RewriteCond %{REQUEST_FILENAME} !-f
 RewriteCond %{REQUEST_FILENAME} !-d
 RewriteRule . /rest.php [L]
</IfModule>
and this will send any unfound page requests to rest.php
Now we can fetch the rest php script from the project repository with the following command:
wget -P /var/www/html http://www.warrensoft.co.uk/home-hub/code/website/html/rest.php
The same warning about security applies here. The rest api has no authentication built in. It provides an access-most-areas pass to inspect (but not change) all the hub’s database contents, so if your hub is internet-facing you are strongly advised to add your own security measures.
Finally we can test our rest interface:
In the next post we will setup a new Raspberry Pi in the role of Voice Assistant.