This is the most challenging phase of the hub project – implementing the BME280 Sensor. This sensor is an amazing piece of electronics: providing temperature, humidity and pressure measurements all for under £10. There is one small snag however; the sensor comes with I2C and SPI interfaces which are designed for very short distance communications e.g. where the sensor is mounted on the same pcb as the controlling processor. This conflicts with our requirement to have sensors many metres from the controlling Pi.
The Pi has I2C and SPI interfaces, so we might be tempted to use a pi zero as a slave bridge, but this is slight overkill and would be a software maintenance overhead.
All is not lost however. The Pi also has a a serial interface, and this is much more suitable for transmission over long distances, especially if we can operate at low baud rates. So all we require is a serial to SPI converter. A quick trawl of the electronics catalogues didn’t throw up any suitable candidates, so I decided to make one with a PICAXE programmable chip. Once you overcome the apprehension of working with yet another programming language (the PICAXE is programmed in a proprietary form of BASIC), the implementation is straightforward. The setup has been working flawlessly in my installation for many months.
You can download the PICAXE program from here.
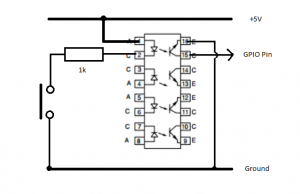
I used the smallest of the PICAXE family – the PICAXE-08M2. This is an 8-pin device, which after power and serial tx/rx leaves 4 pins to use for the custom SPI interface. Some of the larger devices have SPI capability built in, but in the interest of economy this design uses software. Here is the circuit diagram:

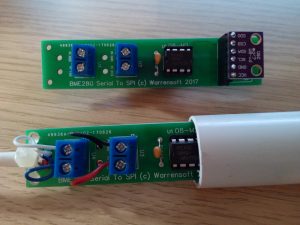
You will need a prototyping board and download cable in order to transfer the program to the picaxe chip, but these are very reasonable and can be reused for other projects. The circuit can be built on veroboard, or alternatively, you can find details of a custom PCB here:
https://easyeda.com/paul.warren/BME280_Serial_To_SPI_Adapter-0666de5ee88f4876baacad8906b33be8
I would recommend using sockets for the picaxe chip and the sensor, as lightning-strike damage is not unheard of.
I was fortunate to have a redundant overflow pipe in my property, which served as a convenient conduit for exposing the sensor to the external environment.
In the next post we will install the Sensor Helper.