Controller – BME280 Installation

Once you have your BME280 sensor assembled you need to fetch the python scripts to talk to it, but first we need to prepare the pi to enable the serial interface for this purpose.

By default, the serial interface is available for console login, so this needs to be disabled.

sudo raspi-config

choose option 5 – Interfacing Options, and option P6 – Serial.

Would you like a login shell to be accessible over serial? Answer No.

Would you like the serial port hardware to be enabled? Answer Yes.

Exit raspi-config, but don’t reboot just yet as we have a number of other changes to make first.

Disable the getty service:

sudo systemctl disable serial-getty@ttyAMA0.service

Install python serial…

sudo apt-get install python-serial

Add the following files to the controller…

wget -nH -x --cut-dirs=3 -P /usr/local/bin/code/controller/ -i /usr/local/bin/code/controller/manifest6.txt http://www.warrensoft.co.uk/home-hub/manifests/controller/manifest6.txt

uncomment the bme280 sensor in /sensor_helpers/__init__.py

and reboot the pi.

You can now check the serial port is available with the following:

 ls -l /dev

and you should see the following alias:

serial0 -> ttyAMA0

Now it should be safe to connect your sensor module to the pi.  If you do this before completing the configuration you may have connection issues, as the pi is interpreting your module as a login.  Note that the Pi TXD (BCM 14) connects to the modules Rx line and Pi RXD (BCM 15) connects to the modules Tx line. The remaining connections are just 3v3 Power and Ground. I recommend you shutdown and power-down to make these connections.

Add a new sensor using the website Organisation page, and set the sensor function to:

bme280./dev/serial0.4800.0

This function is constructed from 4 parts:

helper . serial-port . baudrate . channel

The serial port is /dev/serial0 which is an alias to the ttyAMA0 port we are connected to.

The baud rate is fixed in the picaxe program, at 4800, which works well in my setup.

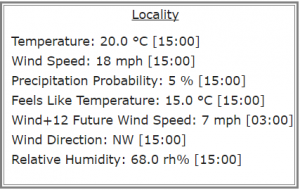
The channel is a value of 0 – Temperature, 1 – Atmospheric Pressure or 2 – Relative Humidity.

With your new sensor configured you should be all set to take readings.

In the next post I will cover interfacing to the Amazon Dash button.

Controller – Meteorology Installation


There are a couple of prerequisites that we need:

sudo pip install python-dateutil

sudo apt-get install python-lxml

If you get an error installing dateutil, try again after removing and replacing pip :

sudo apt-get remove python-pip
sudo easy_install pip

Then we can fetch the sensor helper:

wget -P /usr/local/bin/code/controller/sensor_helpers http://www.warrensoft.co.uk/home-hub/code/controller/sensor_helpers/meteorology.py

uncomment the meteorology sensor in /sensor_helpers/__init__.py

and restart the controller.

Add a new sensor via the Organisation option of the website, and populate the SensorFunction as discussed previously. When displayed in Current Values the reading will be time-stamped with the applicable time:

The meteorology facilities give you a wide range of possibilities for implementing intelligent control algorithms within your hub. Next we will look at an alternative hardware sensor.

Controller – Meteorology Registration

You can register for a UK Met Office DataPoint account here.

Once registered you will be allocated an Application Key, which is required for all queries. In addition to your application key, you will need to know the location id for your nearest monitoring site. A list of locations can be obtained by running the following query in a browser:

http://datapoint.metoffice.gov.uk/public/data/val/wxfcs/all/datatype/sitelist?key=<APIkey>

xml response


It is a long list so you may have to search it to find the nearest location, or use your latitude/longitude coordinates. Once you have your location id, you need to populate 2 new hub user settings: DataPointKey and DataPointLocation.  You can add these in the Organisation page of the website, or use the following commands updated with your own <values>:

 psql -U postgres -d hub -h localhost -c 'INSERT INTO "UserSetting"("Name", "Value") VALUES ('"'"'DataPointKey'"'"', '"'"'<APIkey>'"'"');'
 psql -U postgres -d hub -h localhost -c 'INSERT INTO "UserSetting"("Name", "Value") VALUES ('"'"'DataPointLocation'"'"', <LocationID>);'

We are now in a position to get the forecasts for our location. Plug your values into the following query:

http://datapoint.metoffice.gov.uk/public/data/val/wxfcs/all/xml/3840?res=3hourly&key=<APIkey>

xml response


If you inspect this xml response you will see the list of available parameters. What we require is the parameter name  e.g. ‘G’ is Wind Gust, ‘Pp’ Precipitation Probability, etc. This is a good time to add any new Measurands to our hub organisation.

We should now have all the information we require to populate the SensorFunction field of a new sensor:

e.g. meteorology.240.S

this translates to a look-ahead timespan of 4 hours and the Wind Speed parameter. The hub code will find the nearest forecast to our requested time, and read the data. The reading will be time-stamped with the future time.

Read on to complete the software installation.

Controller – Meteorology Overview

If you live in the UK then you have access to the excellent Met Office DataPoint service. To quote their website:

DataPoint is a service to access freely available Met Office data feeds in a format that is suitable for application developers. It is aimed at anyone looking to re-use Met Office data within their own innovative applications, for example professionals, the scientific community, student and amateur developers.

The hub meteorology sensor type allows us to use met office readings as if they were connected sensors.  This saves us implementing our own physical sensor, which might not be practical, and also gives us access to forecast data without requiring our own super-computer!  For example, if we wanted to know the predicted local temperature, to turn on heating in advance , we can use this facility.

In my opinion this is what elevates the Raspberry Pi to super stardom – the symbiotic combination of global data and local control.

In order to use the service you need to register, but it is free. Once registered you will be allocated an Application Key, which is required for all queries. In addition to your application key, you need to know the location id for your nearest monitoring site and the name code of the parameter you want to measure. Here is a checklist of the required tasks:

  1. Register for a DataPoint Account
  2. Collect your Application Key
  3. Use Key in browser query to obtain a list of sites
  4. Find your nearest site in list – note location id
  5. Populate hub user settings for application key and location id
  6. Use Key in browser query to obtain a list of parameters for that site
  7. Look up the parameter name code for measurement you require
  8. Calculate the look-ahead timespan in minutes e.g. 0, 180, 360, etc.
  9. Assemble your sensor function from the look-ahead and parameter name
  10. Install prerequisites for python
  11. Install the meteorology sensor helper from project repository
  12. Restart Controller
  13. Configure new sensor with sensor function


In the next post I will provide sample browser queries required to set things up.

Controller – Statistics

Now we are collecting data on a regular basis it would be a shame not to record some simple statistics, maximum and minimum values, for each of our measurements. This is what the controller statistics module does.

Download the python script…

wget -P /usr/local/bin/code/controller http://www.warrensoft.co.uk/home-hub/code/controller/statistics.py

and uncomment lines 22, 195 and line 206 of main_sched.py to enable the statistics features. Restart the controller.

A summary of the highs and lows appears, not surprisingly, on the Statistics page. In addition, a daily summary of changes can be delivered by email.

There are a couple of User Settings we need to take care of to complete the configuration. First, there is the Admin Recipient: this is the email address of the occupant who will receive the daily summary report, and secondly Summary Enabled needs to be set to true.

With the configuration completed,  a report will be sent detailing any new highs and lows for the day to the admin user.

From:
Date: 9 Jun 2017 01:00
Subject: Daily Highs and Lows from the Hub 2017-06-09
To: user@example.com
Cc:

 The following highest values have been recorded today:

 * Test Temperature 33.6 degrees C at 23:25 08/06/2017
 * Sinewave Angle 1.0 units at 23:15 08/06/2017

 The following lowest values have been recorded today:

 * Test Temperature 20.5 degrees C at 00:00 09/06/2017
 * Sinewave Angle -1.0 units at 23:45 08/06/2017

Not all sensor readings generate meaningful statistics, so the feature can be disabled on the Sensor form. Be aware that disabling a sensor’s statistics will delete any history.

With statistics implemented we have completed all the milestones in the project plan. In the next post we will reflect on what we have achieved, and consider the next steps.

Impulses

Impulses provide the last of the three key interaction modes we require:

¤ Automated
¤ Remote
¤ Interactive

The mobile-friendly website is fantastic for keeping tabs on your home while you are absent, and could be used within the home, but it can be slightly irksome to have to login to a website just to turn on the heating. This is where the Impulse comes to the rescue. It is a simple button, connected to the hub, which with suitable configuration can generate events much like Conditions.

The concept is very topical, with the release of the Amazon dash buttons (details for connecting these to the hub are provided in a later post!).

Use the following command to download the controller code for impulses:

wget -P /usr/local/bin/code/controller http://www.warrensoft.co.uk/home-hub/code/controller/impulses.py

Uncomment the code for impulses in lines 35 and 186 in main_sched.py, and restart the controller.

Next we need hook up a button to our pi, so we can trigger the impulse. This is discussed in the next post.

Controller – Conditions Software

Use the following to fetch the controller files:

wget -nH -x --cut-dirs=3 -P /usr/local/bin/code/controller/ -i /usr/local/bin/code/controller/manifest4.txt http://www.warrensoft.co.uk/home-hub/manifests/controller/manifest4.txt

monitor.py is responsible for monitoring the conditions and generating events for the event queue. This is one of the more complex pieces of code, but essentially it is parsing the set and reset expressions for all conditions, and placing events in the event queue. The parser has to process expressions which may contain:

time-of-day [‘TOD’]

time-of-weekday [‘TOWD’]

time-of-weekend [‘TOWE’]

sensor values [‘S1’]

actuator timers [‘T1’ or ‘t1’]

All this complexity is hidden from the user however, because a database trigger converts from simple expression formats into a common complex format which is processed by the monitor.

To make this work uncomment the code on lines 32 and 185 of main_sched.py. Now we have the monitor module installed, we can also uncomment the call to truncate_samples() on line 200.

Restart the controller.

In the next post we will install the website pages for conditions and condition graphs, allowing us to add and test them.

Controller – Actuator Software

From the controller’s perspective, driving actuators is simple a matter of translating the state recorded in the database, into a value on a designated GPIO pin. The hub software for actuators uses similar principals to that for the sensors, allowing for future expansion, but currently only supports the simple_on_off function.

Use the following command to download the python files:

wget -nH -x --cut-dirs=3 -P /usr/local/bin/code/controller/ -i /usr/local/bin/code/controller/manifest3.txt http://www.warrensoft.co.uk/home-hub/manifests/controller/manifest3.txt

Edit main_sched.py and uncomment the actuators import on line 29 and the call to process_actuators on line 65, as we did for the sampler.  While you are here you can also enable the timers facility, lines 30 and 87.

Restart the controller.

Obtain the following website files for managing actuators:

wget -nH --cut-dirs=4 --reject "index.html*" -P /var/www/html/ -i /var/www/html/manifest5.txt http://www.warrensoft.co.uk/home-hub/manifests/website/manifest5.txt

There is one actuator already configured in the skeleton database, assigned to GPIO BCM Pin 2 (Header Pin 3), but disabled. Use the Organisation menu option to edit this actuator and enable it. It should then appear on the Actuators page.

Actuators can be set to Hand or Auto.  When in Hand, actuators can only be turned on or off by the user via the website. The hub controller will not be allowed to override this. When in Auto, actuators are solely controlled by the hub controller, and cannot be remotely controlled.

The skeleton actuator should already be in Hand, so you should be able to switch it on and off via the website. When we implement actions later we will put the actuator in Auto to pass control to the hub.

Actuator Timers are associated with each actuator. If you leave the actuator on for few minutes, you will see the on-time displayed.  Similarly, if you leave the actuator off for a while you will see the off-time displayed.  This is useful information, but more importantly, we can use the on-time and off-time in our Conditions. More on that in a later post.

So things are going swimmingly! We have remote control of a relay, which could be used to turn on any gadgets in the home. Now a slight issue.  The relay module I have been using for testing is active-high, whereas the majority of dual/multiple units are active-low. The actuator code is currently programmed for active-high relays.

Which is best?  Well the market appears to be favouring active-high, and they have the advantage that should your pi controller be rebooted, relays that are off stay off. This is an important consideration.

So what can we do?  Well, it is a trivial exercise to modify simple_on_off.py to change the operation, or you could clone the function into active_high_on_off.py, or you could pass an additional parameter. These changes are easily applied with the extensible software structure we have built.

In the next post we will look at Conditions.

Hub Text Alerts

Emails are fine for certain notifications, but in an emergency sms text messages are more convenient and effective. I have been using Textlocal an email-to-sms gateway service, which works tremendously well in the UK. I understand they can operate in other countries, but you may want find an alternative local provider for this service. Basically, you send an email which contains the mobile phone number in the recipient address, and the body of the email is sent as the text message.

There is one user-setting for the Text Provider. The mobile number will be substituted for the placeholder e.g. {0}@sms-provider.example.com. Your chosen provider will detail the format in their documentation. Once you have signed up for a gateway service, and configured the user-setting, all that remains is to add your mobile number to the sensor in the Txt Recipient box.

In the next post we will configure the zones, which define the layout of the house, and form the backdrop of the current values view for the website.

Hub Email Alerts

We have all the controller code installed for Alerts, we just need to configure some values and settings.

Here is my sensor landscape:

Choose a suitable sensor to add some alerts and enter values for High Alert, Low Alert & Email Recipient.

In order for the hub to send email notifications, it needs to know some details about the Mail Server, Email From address and Email Sender. These are Settings that need to be configured in the Organisation | Settings tab.

The Mail Server field needs to be populated with the name of your mail server, and the Email Sender with a valid email address. The Email From field is just the value displayed in the email, and could potentially be any text. I was able to send emails through my ISP with this simple arrangement, however, it should be fairly straightforward to modify the send_email function in helpers.py, and add any additional user settings required.

If you have a working temperature sensor, then all that remains is to warm it up to generate the alert. The value will need to exceed the limit for 3 cycles in order to trigger the alert. This is to prevent erroneous readings from causing unnecessary messages.

If you do not have a real sensor,  you can place the alert on the virtual sensor to confirm your code and email configuration is working. In the next post we will look at SMS alerts.