Voice Interface – Pi Hub-Vox

I am using a Pi 3 Model B with the Voice Hat attached, and assembled as per the instructions provided in the MagPi magazine. Internet access is required, if you want to use the Google service or other cloud offering for Speech-To-Text and obviously network access is required to make REST calls to our home-hub.

The published AIY design requires the big green button to be pushed (or a hand clap) to activate listening mode. Most users want a wake-word as in Alexa, OK Google, Hey Siri, etc.  I was attracted by the Snowboy Hotword Detection Engine, and have recorded a hotword for my system. I still use the green led as a listening indicator.

The listening mode is a contentious subject. On the one hand we do not want voice assistants streaming all our conversations to the cloud, however, with a dedicated voice appliance like the hub-vox, repeatedly issuing wake commands becomes tedious.  Snowboy, being a local detector, provides us with control over this balancing act.

A warning that there is a lot of software that requires installing for the hub-vox, but a script has been written which will complete the task based on a plain vanilla Raspbian Stretch Lite operating system. If you want to install each component separately, you can copy and paste commands from the script to the command line.

Fetch the script…

wget http://www.warrensoft.co.uk/home-hub/linuxscripts/vox/setup.sh

edit the script to customise the settings…

nano setup.sh

make the script executable…

sudo chmod +x setup.sh

and then run it…

sudo ./setup.sh

Here is a summary of the main components installed:

  • Samba – for managing our code
  • Vox code – from the project repository
  • Voice Hat drivers – for microphones and speaker
  • Snowboy – hotword detection
  • PyAudio
  • Python Speech Recognition
  • Google api python client – STT
  • Flac, Pico2wave, Sox – TTS

In the next post we will assemble a test list of utterances and pipe that through the Phrase Processor.

Voice Interface – Home Hub REST

In a previous post we developed a simple api facility for home-hub slaves to enable remote control. The voice interface will use this api for controlling actuators, but it requires a much richer interface to provide a full interactive voice service.

The following instructions will detail how to modify your home-hub to add a full REST api. This will allow us to read data from any table or view in the hub’s database.

Our REST commands will be of the form:

http://home-hub/rest/zones

Normally, the apache web server would throw a page not found error, but with some additional configuration we can direct all such requests to a specific service page.

The first step is to enable the apache rewrite module:

sudo a2enmod rewrite

Then we need to edit the configuration:

sudo nano /etc/apache2/apache2.conf

and find the document root spec:

<Directory /var/www/>
 Options Indexes FollowSymLinks
 AllowOverride None
 Require all granted
</Directory>

and change AllowOverride from None to All.

Restart apache…

sudo service apache2 restart

Then we can add the following .htaccess file to our document root at /var/www:

<IfModule mod_rewrite.c>
 RewriteEngine On
 RewriteBase /
 RewriteCond %{REQUEST_FILENAME} !-f
 RewriteCond %{REQUEST_FILENAME} !-d
 RewriteRule . /rest.php [L]
</IfModule>

and this will send any unfound page requests to rest.php

Now we can fetch the rest php script from the project repository with the following command:

wget -P /var/www/html http://www.warrensoft.co.uk/home-hub/code/website/html/rest.php

The same warning about security applies here. The rest api has no authentication built in. It provides an access-most-areas pass to inspect (but not change) all the hub’s database contents, so if your hub is internet-facing you are strongly advised to add your own security measures.

Finally we can test our rest interface:

http://home-hub/rest/zones

In the next post we will setup a new Raspberry Pi in the role of Voice Assistant.

Hub Database Backups

When you have all your sensors, actuators and impulses configured, and you have defined all your rules and collected a number of months worth of statistical data, the last thing you want is for a crash or gremlin to corrupt your database. The software can be rebuilt with relative ease, but restoring the configuration might not be so easy.

What we require is a nightly database backup, to a separate location that will be safe should our Pi come to any harm. I am using a shared directory on my NAS drive, but a small USB drive would be just as good.

If you want to set this up, add the following commands to your crontab scheduler using sudo crontab -e:

SHELL=/bin/bash
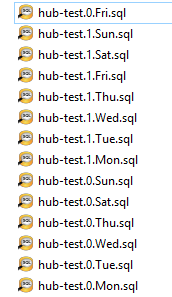
1 1 * * * /usr/bin/sudo pg_dump -h localhost -U postgres hub -f /mnt/piback/$(hostname).$[$(date +\%-W) \% 2].$(date +\%a).sql

/mnt/piback is the mounted directory for my installation, which you may need to tailor for your own setup. There are many tutorials on the web which explain how to add an external drive to the Pi.  The command will produce a rolling backup which will wrap around every fortnight:

If disaster should strike you can restore to a known good point.

In a future series of posts I will be investigating voice control for the hub, using integration with the Google AIY Voice Kit.

Controller – Amazon Dash Button

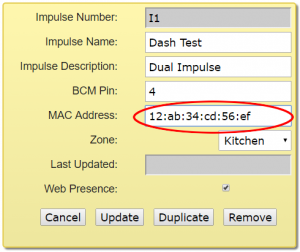
The Amazon Dash is a self-contained WiFi enabled remote control button, available to Amazon Prime members, that we can interface with our home hub as an Impulse button.  The advantage is that we don’t require physical wiring or additional electronics – we just sniff the network looking for the signature mac address of the button. The beauty of this adaptation is that we can implement hybrid Impulses, that respond to either fixed buttons connected to GPIO pins, or dash buttons free floating on the network.

The process to configure the button, without actually committing yourself to the repeated purchase, is well documented elsewhere. The key piece of information we require is the button’s mac address.  I was able to glean this from my router log, or you can try the python test program sniff_test.py below.

import socket
import struct
import binascii

mac_dict = {}

RAW_SOCKET = socket.socket(
 socket.AF_PACKET,
 socket.SOCK_RAW,
 socket.htons(0x0003))

while True:
    packet = RAW_SOCKET.recvfrom(2048)
    ethernet_header = packet[0][0:14]
    ethernet_detailed = struct.unpack("!6s6s2s", ethernet_header)

    arp_header = packet[0][14:42]
    arp_detailed = struct.unpack("2s2s1s1s2s6s4s6s4s", arp_header)

    ethertype = ethernet_detailed[2]
    opcode = arp_detailed[4]
    if ethertype == '\x08\x00' and opcode == '\x00\x00':
        mac_address = (
         ':'.join(s.encode('hex')
         for s in binascii.hexlify(ethernet_detailed[1]).decode('hex')))
         if mac_address in mac_dict:
             mac_dict[mac_address] += 1
         else:
             mac_dict[mac_address] = 1
 
        if mac_dict[mac_address] < 5:
            print "Source MAC: ", mac_address, mac_dict[mac_address]

Run the test program with the following command:

sudo python sniff_test.py

and you should see a list of mac addresses from devices on your network. Wait a while to hoover up non-dash packets then press the button, and look for a different mac address. You may see double entries for the dash, but don’t worry as this will be handled by our existing software debounce routine.

Once we have discovered the mac address we need to add it to the existing impulse configuration.

The sniffing is performed by a separate thread in the hub main program. Download the new main_sched py file:

wget -O /usr/local/bin/code/controller/main_sched.py http://www.warrensoft.co.uk/home-hub/code/controller/dash/main_sched.py

and a revised impulse processor:

wget -O /usr/local/bin/code/controller/impulses.py http://www.warrensoft.co.uk/home-hub/code/controller/dash/impulses.py

and restart the controller to use the modified files.

Now you should be able to enjoy remote control for any of the devices in your hub.

In the next post I will look at backing up the hub database.

Controller – BME280 Installation

Once you have your BME280 sensor assembled you need to fetch the python scripts to talk to it, but first we need to prepare the pi to enable the serial interface for this purpose.

By default, the serial interface is available for console login, so this needs to be disabled.

sudo raspi-config

choose option 5 – Interfacing Options, and option P6 – Serial.

Would you like a login shell to be accessible over serial? Answer No.

Would you like the serial port hardware to be enabled? Answer Yes.

Exit raspi-config, but don’t reboot just yet as we have a number of other changes to make first.

Disable the getty service:

sudo systemctl disable serial-getty@ttyAMA0.service

Install python serial…

sudo apt-get install python-serial

Add the following files to the controller…

wget -nH -x --cut-dirs=3 -P /usr/local/bin/code/controller/ -i /usr/local/bin/code/controller/manifest6.txt http://www.warrensoft.co.uk/home-hub/manifests/controller/manifest6.txt

uncomment the bme280 sensor in /sensor_helpers/__init__.py

and reboot the pi.

You can now check the serial port is available with the following:

 ls -l /dev

and you should see the following alias:

serial0 -> ttyAMA0

Now it should be safe to connect your sensor module to the pi.  If you do this before completing the configuration you may have connection issues, as the pi is interpreting your module as a login.  Note that the Pi TXD (BCM 14) connects to the modules Rx line and Pi RXD (BCM 15) connects to the modules Tx line. The remaining connections are just 3v3 Power and Ground. I recommend you shutdown and power-down to make these connections.

Add a new sensor using the website Organisation page, and set the sensor function to:

bme280./dev/serial0.4800.0

This function is constructed from 4 parts:

helper . serial-port . baudrate . channel

The serial port is /dev/serial0 which is an alias to the ttyAMA0 port we are connected to.

The baud rate is fixed in the picaxe program, at 4800, which works well in my setup.

The channel is a value of 0 – Temperature, 1 – Atmospheric Pressure or 2 – Relative Humidity.

With your new sensor configured you should be all set to take readings.

In the next post I will cover interfacing to the Amazon Dash button.

Controller – Meteorology Installation


There are a couple of prerequisites that we need:

sudo pip install python-dateutil

sudo apt-get install python-lxml

If you get an error installing dateutil, try again after removing and replacing pip :

sudo apt-get remove python-pip
sudo easy_install pip

Then we can fetch the sensor helper:

wget -P /usr/local/bin/code/controller/sensor_helpers http://www.warrensoft.co.uk/home-hub/code/controller/sensor_helpers/meteorology.py

uncomment the meteorology sensor in /sensor_helpers/__init__.py

and restart the controller.

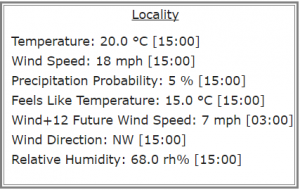
Add a new sensor via the Organisation option of the website, and populate the SensorFunction as discussed previously. When displayed in Current Values the reading will be time-stamped with the applicable time:

The meteorology facilities give you a wide range of possibilities for implementing intelligent control algorithms within your hub. Next we will look at an alternative hardware sensor.

Controller – Meteorology Registration

You can register for a UK Met Office DataPoint account here.

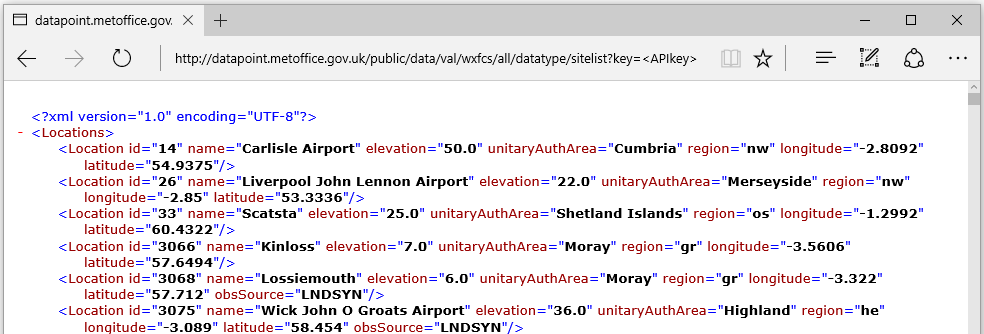
Once registered you will be allocated an Application Key, which is required for all queries. In addition to your application key, you will need to know the location id for your nearest monitoring site. A list of locations can be obtained by running the following query in a browser:

http://datapoint.metoffice.gov.uk/public/data/val/wxfcs/all/datatype/sitelist?key=<APIkey>

xml response


It is a long list so you may have to search it to find the nearest location, or use your latitude/longitude coordinates. Once you have your location id, you need to populate 2 new hub user settings: DataPointKey and DataPointLocation.  You can add these in the Organisation page of the website, or use the following commands updated with your own <values>:

 psql -U postgres -d hub -h localhost -c 'INSERT INTO "UserSetting"("Name", "Value") VALUES ('"'"'DataPointKey'"'"', '"'"'<APIkey>'"'"');'
 psql -U postgres -d hub -h localhost -c 'INSERT INTO "UserSetting"("Name", "Value") VALUES ('"'"'DataPointLocation'"'"', <LocationID>);'

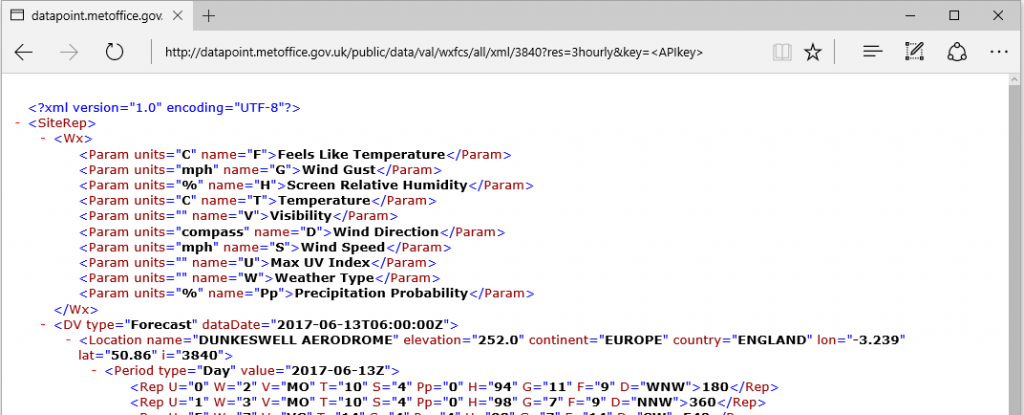
We are now in a position to get the forecasts for our location. Plug your values into the following query:

http://datapoint.metoffice.gov.uk/public/data/val/wxfcs/all/xml/3840?res=3hourly&key=<APIkey>

xml response


If you inspect this xml response you will see the list of available parameters. What we require is the parameter name  e.g. ‘G’ is Wind Gust, ‘Pp’ Precipitation Probability, etc. This is a good time to add any new Measurands to our hub organisation.

We should now have all the information we require to populate the SensorFunction field of a new sensor:

e.g. meteorology.240.S

this translates to a look-ahead timespan of 4 hours and the Wind Speed parameter. The hub code will find the nearest forecast to our requested time, and read the data. The reading will be time-stamped with the future time.

Read on to complete the software installation.

Controller – Meteorology Overview

If you live in the UK then you have access to the excellent Met Office DataPoint service. To quote their website:

DataPoint is a service to access freely available Met Office data feeds in a format that is suitable for application developers. It is aimed at anyone looking to re-use Met Office data within their own innovative applications, for example professionals, the scientific community, student and amateur developers.

The hub meteorology sensor type allows us to use met office readings as if they were connected sensors.  This saves us implementing our own physical sensor, which might not be practical, and also gives us access to forecast data without requiring our own super-computer!  For example, if we wanted to know the predicted local temperature, to turn on heating in advance , we can use this facility.

In my opinion this is what elevates the Raspberry Pi to super stardom – the symbiotic combination of global data and local control.

In order to use the service you need to register, but it is free. Once registered you will be allocated an Application Key, which is required for all queries. In addition to your application key, you need to know the location id for your nearest monitoring site and the name code of the parameter you want to measure. Here is a checklist of the required tasks:

  1. Register for a DataPoint Account
  2. Collect your Application Key
  3. Use Key in browser query to obtain a list of sites
  4. Find your nearest site in list – note location id
  5. Populate hub user settings for application key and location id
  6. Use Key in browser query to obtain a list of parameters for that site
  7. Look up the parameter name code for measurement you require
  8. Calculate the look-ahead timespan in minutes e.g. 0, 180, 360, etc.
  9. Assemble your sensor function from the look-ahead and parameter name
  10. Install prerequisites for python
  11. Install the meteorology sensor helper from project repository
  12. Restart Controller
  13. Configure new sensor with sensor function


In the next post I will provide sample browser queries required to set things up.

Controller – Slave Hub

You will have seen references to the slave flag in the main scheduler program. This is a boolean value passed in when the controller is first started up. We have set it to false for all operations to date, as we have been building our master hub, but if we set this flag to true then we would launch the hub in slave mode.

A Slave hub is a cut-down appliance that is focused on reading sensors and driving actuators. It still has all of the software installation of a master hub, but some routines are not used. I will be publishing an installation script and SD image file in the resources section soon, so you don’t have to manually construct another hub. The master hub will talk to the slave over the network, giving you the extended reach for your sensors and actuators. The Pi Zero W is the ideal candidate for implementing a slave hub.

Once you have your second pi up and running, all that is required to make it a slave is the following:

1. Install the api:

wget -P /var/www/html http://www.warrensoft.co.uk/home-hub/code/website/html/api.php

2. Change the slave hostname – to distinguish master and slave when configuring

3. Edit /etc/rc.local and change the –slave=false to –slave=true in the line launching main_sched.py and optionally reduce the logging level to just errors –log=ERROR or no logging –log=CRITICAL

4. Reboot the slave

5. Test the api:

http://slave-hub/api.php?sensor=1

Now we need to add some software to our master hub to equip it to talk to slaves.  This comes in the form of a remote sensor helper and a remote actuator helper.

wget -nH -x --cut-dirs=3 -P /usr/local/bin/code/controller/ -i /usr/local/bin/code/controller/manifest5.txt http://www.warrensoft.co.uk/home-hub/manifests/controller/manifest5.txt

These helpers need to be un-commented in their respective __init__.py files.

We also need the python requests module, via pip:

sudo apt-get install python-pip
sudo pip install requests
sudo pip install --upgrade requests-cache

Restart the controller and add a new sensor, this time with the Sensor Function of the form:

remote.x.y

where x represents the least significant part of the ip address of the slave, and y represents the remote sensor number. For example, if we had a master hub on 170.30.90.40, and a slave on 170.30.90.41 with a Sensor S3,  then the sensor function in the master would be:

remote.41.3

Once configured the remote sensor is identical to a local sensor, and can be sampled, alerted, monitored, etc.

An identical  approach applies to remote actuators, so the actuator function remote.41.4 would control actuator 4 on the slave hub.

Just a note about security. Remote access to the api page is not secure, unlike the normal website functions. Rather than publish details on a public blog, it is left to the reader to implement whatever mechanism they feel is appropriate. One possible setup is to make just the master hub website accessible over the internet, on a different port, but not the slave hub(s). Consult your router documentation for details.

Next we will look at fetching our readings from slightly further afield.

Controller – Statistics

Now we are collecting data on a regular basis it would be a shame not to record some simple statistics, maximum and minimum values, for each of our measurements. This is what the controller statistics module does.

Download the python script…

wget -P /usr/local/bin/code/controller http://www.warrensoft.co.uk/home-hub/code/controller/statistics.py

and uncomment lines 22, 195 and line 206 of main_sched.py to enable the statistics features. Restart the controller.

A summary of the highs and lows appears, not surprisingly, on the Statistics page. In addition, a daily summary of changes can be delivered by email.

There are a couple of User Settings we need to take care of to complete the configuration. First, there is the Admin Recipient: this is the email address of the occupant who will receive the daily summary report, and secondly Summary Enabled needs to be set to true.

With the configuration completed,  a report will be sent detailing any new highs and lows for the day to the admin user.

From:
Date: 9 Jun 2017 01:00
Subject: Daily Highs and Lows from the Hub 2017-06-09
To: user@example.com
Cc:

 The following highest values have been recorded today:

 * Test Temperature 33.6 degrees C at 23:25 08/06/2017
 * Sinewave Angle 1.0 units at 23:15 08/06/2017

 The following lowest values have been recorded today:

 * Test Temperature 20.5 degrees C at 00:00 09/06/2017
 * Sinewave Angle -1.0 units at 23:45 08/06/2017

Not all sensor readings generate meaningful statistics, so the feature can be disabled on the Sensor form. Be aware that disabling a sensor’s statistics will delete any history.

With statistics implemented we have completed all the milestones in the project plan. In the next post we will reflect on what we have achieved, and consider the next steps.