
Use the following to install the Conditions features for the website:
wget -nH --cut-dirs=4 --reject "index.html*" -P /var/www/html/ -i /var/www/html/manifest6.txt http://www.warrensoft.co.uk/home-hub/manifests/website/manifest6.txt
This provides the menu option to allow you to add add and edit simple Sensor Conditions, Time-based Conditions and Complex Conditions. This is a more user-friendly interface which is applicable to all hub users, not just administrators. If you click the Conditions option you will see there is a sample condition provided, which operates on the sine-wave virtual sensor.
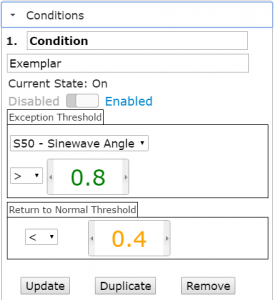
Enable this condition, and click the Update button to save. Events should now start appearing in our event queue.
How do we know if this is working?
Well, there are 2 ways. The Statistics page has a useful table showing the last 10 events. They will be listed as unprocessed at this stage, as we haven’t installed the rules engine, but you should see them appearing as set/reset pairs. The table is fine for administrators, but we really need a better visual display of our conditions and events, to confirm the logic is meeting our requirements.
This is the purpose of the Condition Graphs website option. This should now be available, so if you select it you should see a graph showing 3 traces:
1. The sample trace of the condition sensor(s)
2. Any set-points – shown as a dotted/dashed lines
3. Event transitions
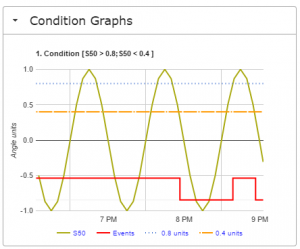
This is an invaluable tool for checking and adjusting your condition expressions to get the correct outcomes.
The example condition is a slightly unrealistic scenario, in that we are not switching anything from our events, and so the sensor values do not respond, but shortly we will address that.
We are tantalisingly close to closing the control loop. All we need is to link our events to actuators. This is accomplished with Rules and Actions. These are described in the next post.