Hub Database Backups

When you have all your sensors, actuators and impulses configured, and you have defined all your rules and collected a number of months worth of statistical data, the last thing you want is for a crash or gremlin to corrupt your database. The software can be rebuilt with relative ease, but restoring the configuration might not be so easy.

What we require is a nightly database backup, to a separate location that will be safe should our Pi come to any harm. I am using a shared directory on my NAS drive, but a small USB drive would be just as good.

If you want to set this up, add the following commands to your crontab scheduler using sudo crontab -e:

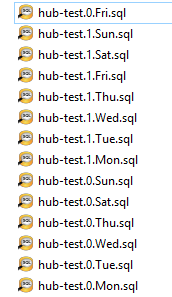
SHELL=/bin/bash
1 1 * * * /usr/bin/sudo pg_dump -h localhost -U postgres hub -f /mnt/piback/$(hostname).$[$(date +\%-W) \% 2].$(date +\%a).sql

/mnt/piback is the mounted directory for my installation, which you may need to tailor for your own setup. There are many tutorials on the web which explain how to add an external drive to the Pi.  The command will produce a rolling backup which will wrap around every fortnight:

If disaster should strike you can restore to a known good point.

In a future series of posts I will be investigating voice control for the hub, using integration with the Google AIY Voice Kit.

Software – Hub Database

Now we have a working database server, we can create and populate the hub database itself.

This is the first of a number of commands that use wget to download files from the project repository.

cd ~
wget http://warrensoft.co.uk/home-hub/database/scripts/hub-skeleton.sql
psql -h localhost -U postgres -d postgres -f hub-skeleton.sql

After confirming your postgres password you should have a hub database containing 16 tables (some populated with basic data), plus a number of supporting views and functions.  We will examine this schema in the next post.

Software – Database Server

PostgreSQL is described as the world’s most advanced open-source database, and underpins a number of features of the home hub. It runs quite happily on the raspberry pi.

sudo apt-get install postgresql

There are three areas that require configuring, in order to allow the controller and website scripts to access the database. In addition, we should include access from our desktop PC, which will allow us to administer the database using the management tool pgAdmin.

The first task is to edit the configuration file:

cd /etc/postgresql/9.4/main
sudo nano postgresql.conf

Uncomment and modify the listen_addresses connection setting and change the value to ‘*’ to listen on all interfaces. Save the file. Restart the database server.

sudo /etc/init.d/postgresql restart

The next task is to edit pg_hba.conf to enable connections from localhost and your PC.

sudo nano pg_hba.conf

Edit the file to enable connections from your desktop machine…

# IPv4 local connections:
host             all             all             client.ip.add.ress/32           md5

Access from the pi itself should already be configured…

# IPv6 local connections:
host             all             all             ::1/128                                         md5

save the file, and reload the configuration.

sudo /etc/init.d/postgresql reload

The final task is to set the postgres user password. Replace ‘raspberry’ with your chosen password.

sudo -u postgres psql -c "alter user postgres password 'raspberry';"

You should now be able to connect to the database server from pgAdmin running on your client PC.

In the next post we will create a skeleton database.