
The high-level design is divided into 3 blocks: the controller, database and website.
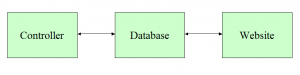
The benefit of this arrangement is that there is a clear separation of duties between the controller and the website. I exploited this opportunity to code them in different languages: python for the controller and php for the website. This allows each component to be coded in the language best suited to its needs, with no compromises.
Specification
Here is the list of requirements originally envisaged for the hub:
- Modular sampler that could take readings from different sensors for temperature, humidity, etc.
- Autonomous controller that could switch extractor fans, external lights, central heating, etc.
- Logger that could save sensor values at regular intervals
- Web Interface that would enable remote monitoring and control
- Alerts for abnormal conditions via email and text message
- Simple interface for configuring conditions and rules
- Statistics for recording longer-term highs and lows
- Time-based rules enabling replacement of central heating time clock
- Easy-to-configure access to forecast data for predictive control
There are many platforms available that could achieve all of these aims, however, at the time I could not settle on any one that offered the flexibility and modularity I required.
Resources
All resources used in this project are available at the following address:
http://warrensoft.co.uk/home-hub
At various stages in the project, I provide download commands that fetch the database scripts, code files and supporting files required to make the stage function.
In addition there is a setup script and a complete SD Card Image file for anyone wanting to implement the project without working through the posts.
Using the setup script
This is the preferred quick way to setup a home hub, as compiled resources will be built on the target machine. If you have the raspbian os installed, you can fetch the setup script with the following command…
wget http://www.warrensoft.co.uk/home-hub/linuxscripts/setup.sh
edit the script to customise the settings…
nano setup.sh
make the script executable…
sudo chmod +x setup.sh
and then run it…
sudo ./setup.sh
This procedure will install all the necessary software and produce a working skeleton hub.
Using the SD Card Image
If you want to use the sd card image then you will need to:
1. Download it
2. Unzip it to a .img file
3. Write it to an sd card
4. Insert into pi and boot
5. Login over ssh with pi/raspberry
6. Use sudo raspi-config to expand root filesystem and change password
7. reboot and enjoy