Website – Impulses

We already have the facilities to add and edit impulses, within the Organisation menu option.  Select the Add Impulse link and fill in the details. The key field is the BCM Pin. This obviously needs to be the pin that your switch is connected to. The controller is constantly monitoring impulse configurations in the database, in order to set up the necessary event callback hooks.

The next step is to monitor the event queue on the website Statistics page, while pressing the impulse button. As mentioned earlier, debouncing may not be sufficient defence against noise, so the controller code employs an additional lockout mechanism which prevents repeat events within 10 seconds of a button press. The main scheduler module is already optimised to keep a lookout for rules, and to process actuators, so the overall effect is that there should be reasonable response to pressing an impulse button.

The event queue is the place to track impulse events and make sure you are getting the expected results. As with Conditions, Impulses won’t be processed until there is a connected Rule and Action. Make sure you use the toggle_actuator Action Function for impulses, to get the push-on-push-off behaviour, unlike the action_actuator used previously for Conditions.

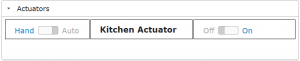
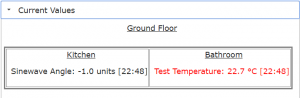
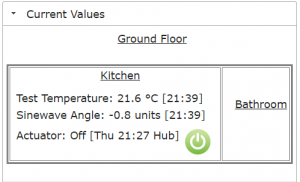
Impulses will appear as a clickable icon on the Current Values page of the website, within the Zone of their linked Actuator.

There is only one topic left on our project plan to implement – Statistics. This is covered in the next post.

Impulses

Impulses provide the last of the three key interaction modes we require:

¤ Automated
¤ Remote
¤ Interactive

The mobile-friendly website is fantastic for keeping tabs on your home while you are absent, and could be used within the home, but it can be slightly irksome to have to login to a website just to turn on the heating. This is where the Impulse comes to the rescue. It is a simple button, connected to the hub, which with suitable configuration can generate events much like Conditions.

The concept is very topical, with the release of the Amazon dash buttons (details for connecting these to the hub are provided in a later post!).

Use the following command to download the controller code for impulses:

wget -P /usr/local/bin/code/controller http://www.warrensoft.co.uk/home-hub/code/controller/impulses.py

Uncomment the code for impulses in lines 35 and 186 in main_sched.py, and restart the controller.

Next we need hook up a button to our pi, so we can trigger the impulse. This is discussed in the next post.

Time-Based Conditions

One of the design goals for the home-hub was for it to replace the traditional central heating programmer. I have never found these easy to work with, often tucked away in awkward locations, and had the picture in my mind of reclining on the sofa -tablet in hand – adjusting the programs. I will describe the process of interfacing the hub with a central heating programmer in a later post.

As significant effort had been put into the processing of conditions, rules and actions, I concluded this could be re-purposed for time-based conditions.  If you add a new Time-based condition you will see the following:

You can choose from Daily, Weekdays or Weekend programmes. All that is required is to connect this Condition up to an Actuator Action via a Rule and you can switch devices on schedule.

The next post will introduce the concept of impulses.

Rules and Actions

Your hub should be generating events in the queue, but they are not currently being processed. The Rules Engine is the module that handles this, and it should already have been installed. We just need to enable it by uncommenting lines 33 and 64 in main_sched.py and restarting the controller.

A sample Rule R1 has already been provided in the skeleton database, which is linked to Condition C1 that is generating the events. There is also a sample Action A1, but currently they are both disabled. You should enable them both now.  Rules are simply constructs that bind an Action to a Condition.


Actions use the familiar helper functions approach, but in this case they all reside in a single file action_helpers.py  In this example we are going to use the action_actuator Action, but future actions could be added to perform any task. The Actuator Function is set to action_actuator.1, which translates as:

set the actuator state equal to the event state

We also have other helpers: a toggle_actuator action which will flip the state of the specified actuator and stop_actuator. These will be used later when we implement Impulses.  Actions can also send emails and/or text messages when they operate. Each type is associated with a template, which has placeholders for key details about the action.

There is one final step to complete before our action can switch the actuator relay. You may recall that our actuator was placed in Hand, so that we could remotely control it, but this will prevent the hub controller from controlling it, so you need to switch it to Auto. 

You should now notice three things:

1.  Your relay should switch on when the set threshold is reached, and off when the reset threshold is reached

2. In Statistics – events in the Event Queue are marked as Processed

3.  In Current Values – the Actuator State is displayed in its zone

What you can do now with your test setup, is connect a lamp to the actuator relay to use as a heating element, and attach it to the temperature sensor.  Change the condition to monitor the temperature sensor and set some suitable thresholds. You should see some more realistic activity in the Condition Graphs.

That completes the implementation of Rules and Actions. In the next post we will configure a time-based condition.

Website – Conditions Page

Use the following to install the Conditions features for the website:

wget -nH --cut-dirs=4 --reject "index.html*" -P /var/www/html/ -i /var/www/html/manifest6.txt http://www.warrensoft.co.uk/home-hub/manifests/website/manifest6.txt

This provides the menu option to allow you to add add and edit simple Sensor Conditions, Time-based Conditions and Complex Conditions. This is a more user-friendly interface which is applicable to all hub users, not just administrators. If you click the Conditions option you will see there is a sample condition provided, which operates on the sine-wave virtual sensor.

Enable this condition, and click the Update button to save.  Events should now start appearing in our event queue.

How do we know if this is working?

Well, there are 2 ways. The Statistics page has a useful table showing the last 10 events. They will be listed as unprocessed at this stage, as we haven’t installed the rules engine, but you should see them appearing as set/reset pairs. The table is fine for administrators, but we really need a better visual display of our conditions and events, to confirm the logic is meeting our requirements.

This is the purpose of the Condition Graphs website option. This should now be available, so if you select it you should see a graph showing 3 traces:

1.  The sample trace of the condition sensor(s)

2. Any set-points – shown as a dotted/dashed lines

3. Event transitions

This is an invaluable tool for checking and adjusting your condition expressions to get the correct outcomes.

The example condition is a slightly unrealistic scenario, in that we are not switching anything from our events, and so the sensor values do not respond, but shortly we will address that.

We are tantalisingly close to closing the control loop. All we need is to link our events to actuators. This is accomplished with Rules and Actions. These are described in the next post.

Controller – Conditions Software

Use the following to fetch the controller files:

wget -nH -x --cut-dirs=3 -P /usr/local/bin/code/controller/ -i /usr/local/bin/code/controller/manifest4.txt http://www.warrensoft.co.uk/home-hub/manifests/controller/manifest4.txt

monitor.py is responsible for monitoring the conditions and generating events for the event queue. This is one of the more complex pieces of code, but essentially it is parsing the set and reset expressions for all conditions, and placing events in the event queue. The parser has to process expressions which may contain:

time-of-day [‘TOD’]

time-of-weekday [‘TOWD’]

time-of-weekend [‘TOWE’]

sensor values [‘S1’]

actuator timers [‘T1’ or ‘t1’]

All this complexity is hidden from the user however, because a database trigger converts from simple expression formats into a common complex format which is processed by the monitor.

To make this work uncomment the code on lines 32 and 185 of main_sched.py. Now we have the monitor module installed, we can also uncomment the call to truncate_samples() on line 200.

Restart the controller.

In the next post we will install the website pages for conditions and condition graphs, allowing us to add and test them.

Conditions, Rules and Actions

We need to produce discrete digital events from the analogue data generated by our sensors, in order to switch our actuators. The Condition does this job in the hub. An example will help to illustrate.

One of the motivations for building the home hub was to control a bathroom extractor fan; part of a condensation reduction initiative. OK I could have bought a fan with an integrated sensor, but where’s the fun in that!  I was measuring the relative humidity, so it was a simple task to check when this exceeded a threshold in order to switch the fan on, and check for going below another threshold to switch off. This Set/Reset pattern provides hysteresis, ensuring we don’t perform unnecessary switching, and is the essence of Conditions.

I had a number of other requirements I was hoping to satisfy in the design.

  • A simple UI – allowing non-admins to edit conditions and thresholds
  • Time clock facilities – treating the time of day like a sensor reading, allows the hub to replace a traditional central-heating programmer
  • Complex Expressions – a system that could cope with multiple variables in set/reset expressions

The implementation has fulfilled all of these requirements.

Returning to the bathroom fan problem, I started with the following simple expressions:

SET: S3 > 99   RESET: S3 < 75    ( where S3 is bathroom R.H. )

until the complaints from occupants arrived, ‘Can you switch that fan off – it’s freezing in here’. So I added temperature to the expressions:

SET: S3 > 99  and S4 > 17

RESET: S3 < 75 or S4 < 16    ( S4 is bathroom Temperature )

This improved the situation, but then I noticed that the fan would sometimes run for long periods. The assumption was that the replacement air was also high in moisture, so Actuator Timers were introduced. Here are the final expressions:

SET: S3 > 99  and S4 > 17 and t1 > 5      ( t1 is Fan Off-Timer )

RESET: S3 < 75 or S4 < 16 or T1 > 15    ( T1 is Fan On-timer )

The use of timers ensures the fan only runs for 15 minutes, and then pauses for 5.

In the next post we will install the software to handle Conditions.

Controller – Actuator Software

From the controller’s perspective, driving actuators is simple a matter of translating the state recorded in the database, into a value on a designated GPIO pin. The hub software for actuators uses similar principals to that for the sensors, allowing for future expansion, but currently only supports the simple_on_off function.

Use the following command to download the python files:

wget -nH -x --cut-dirs=3 -P /usr/local/bin/code/controller/ -i /usr/local/bin/code/controller/manifest3.txt http://www.warrensoft.co.uk/home-hub/manifests/controller/manifest3.txt

Edit main_sched.py and uncomment the actuators import on line 29 and the call to process_actuators on line 65, as we did for the sampler.  While you are here you can also enable the timers facility, lines 30 and 87.

Restart the controller.

Obtain the following website files for managing actuators:

wget -nH --cut-dirs=4 --reject "index.html*" -P /var/www/html/ -i /var/www/html/manifest5.txt http://www.warrensoft.co.uk/home-hub/manifests/website/manifest5.txt

There is one actuator already configured in the skeleton database, assigned to GPIO BCM Pin 2 (Header Pin 3), but disabled. Use the Organisation menu option to edit this actuator and enable it. It should then appear on the Actuators page.

Actuators can be set to Hand or Auto.  When in Hand, actuators can only be turned on or off by the user via the website. The hub controller will not be allowed to override this. When in Auto, actuators are solely controlled by the hub controller, and cannot be remotely controlled.

The skeleton actuator should already be in Hand, so you should be able to switch it on and off via the website. When we implement actions later we will put the actuator in Auto to pass control to the hub.

Actuator Timers are associated with each actuator. If you leave the actuator on for few minutes, you will see the on-time displayed.  Similarly, if you leave the actuator off for a while you will see the off-time displayed.  This is useful information, but more importantly, we can use the on-time and off-time in our Conditions. More on that in a later post.

So things are going swimmingly! We have remote control of a relay, which could be used to turn on any gadgets in the home. Now a slight issue.  The relay module I have been using for testing is active-high, whereas the majority of dual/multiple units are active-low. The actuator code is currently programmed for active-high relays.

Which is best?  Well the market appears to be favouring active-high, and they have the advantage that should your pi controller be rebooted, relays that are off stay off. This is an important consideration.

So what can we do?  Well, it is a trivial exercise to modify simple_on_off.py to change the operation, or you could clone the function into active_high_on_off.py, or you could pass an additional parameter. These changes are easily applied with the extensible software structure we have built.

In the next post we will look at Conditions.

Sampling and Comparison Graphs

A graph of our sensor values changing over time is the most effective way to understand what is happening in the home environment. We need 2 new controller files: sampler.py and sampler_helpers.py

wget -nH -x --cut-dirs=3 -P /usr/local/bin/code/controller/ -i /usr/local/bin/code/controller/manifest2.txt http://www.warrensoft.co.uk/home-hub/manifests/controller/manifest2.txt

Edit existing main_sched.py and uncomment the sampler import on line 27 and the call to process_samples on line 194. Restart the controller.

Edit your sensors and set the Sample Type to Raw. Raw is the only sample mode currently implemented, which just records the current value, but future options might include smoothing or prediction.

Fetch the files for the website…

wget -nH --cut-dirs=4 --reject "index.html*" -P /var/www/html/ -i /var/www/html/manifest4.txt http://www.warrensoft.co.uk/home-hub/manifests/website/manifest4.txt

comparisonGraphs groups sensors by measurand, and draws a graph for each group.

getComparisonChartData is responsible for supplying the data in the form of a  json table

Checkout the documentation and examples at https://developers.google.com/chart/ for more information.

If everything is working you should now be seeing some graphs when you select Comparison Graphs on  the website!

A few features to note with graphs:

1.  You can hover over a trace to pop-up a box showing the value at that time

2. You can click the time-base axis and cycle through various time-spans.   The default is 24 hours, and the longest is 96 hours

3. Graphs auto-refresh.

To prevent the database from growing too big there is a main_sched task that truncates samples. This will become available when we implement the monitor module later.

In the next post we will add an actuator so we can control some plant.

Website – Current Values

The statistics are very useful when configuring sensors and setting up your hub, but for daily use we need a more contextual presentation of temperature readings, etc.

Use the following command to fetch the necessary website files:

wget -r -nH --cut-dirs=4 --reject "index.html*" -P /var/www/html/ -i /var/www/html/manifest3.txt http://www.warrensoft.co.uk/home-hub/manifests/website/manifest3.txt

Now you can refresh the website in your browser and choose the Current Values option.

All Sensors, Actuators and Impulses are assigned to a zone, and will be displayed within that zonal box in this floor plan representation. You will want to make your display mimic the layout of your house, as far as possible.

To achieve this each zone has X, Y and Z co-ordinates, with Z representing the floor number. In addition, each zone has Rowspan and Colspan values which enable the size of the zone to be adjusted relative to neighbouring zones. Anyone familiar with html table construction will quickly be able to model the rooms of their house (which is how the plan is drawn!). If not, then a drawing on squared paper will help. Here is an example:

Zone NameXYZRowspanColspan
Kitchen11111
Bathroom12111
Lounge21121
Bedroom22111
Study32111

In the next post we will enable sampling, and see our sensor values displayed on a graph.