Hub Text Alerts

Emails are fine for certain notifications, but in an emergency sms text messages are more convenient and effective. I have been using Textlocal an email-to-sms gateway service, which works tremendously well in the UK. I understand they can operate in other countries, but you may want find an alternative local provider for this service. Basically, you send an email which contains the mobile phone number in the recipient address, and the body of the email is sent as the text message.

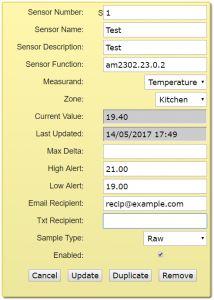
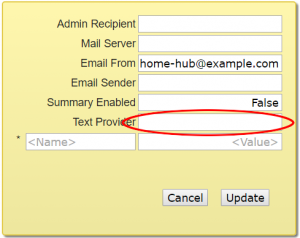
There is one user-setting for the Text Provider. The mobile number will be substituted for the placeholder e.g. {0}@sms-provider.example.com. Your chosen provider will detail the format in their documentation. Once you have signed up for a gateway service, and configured the user-setting, all that remains is to add your mobile number to the sensor in the Txt Recipient box.

In the next post we will configure the zones, which define the layout of the house, and form the backdrop of the current values view for the website.

Hub Email Alerts

We have all the controller code installed for Alerts, we just need to configure some values and settings.

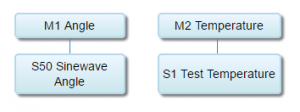
Here is my sensor landscape:

Choose a suitable sensor to add some alerts and enter values for High Alert, Low Alert & Email Recipient.

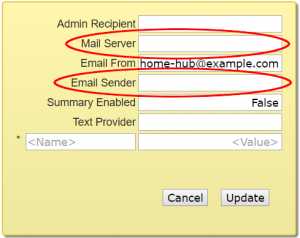
In order for the hub to send email notifications, it needs to know some details about the Mail Server, Email From address and Email Sender. These are Settings that need to be configured in the Organisation | Settings tab.

The Mail Server field needs to be populated with the name of your mail server, and the Email Sender with a valid email address. The Email From field is just the value displayed in the email, and could potentially be any text. I was able to send emails through my ISP with this simple arrangement, however, it should be fairly straightforward to modify the send_email function in helpers.py, and add any additional user settings required.

If you have a working temperature sensor, then all that remains is to warm it up to generate the alert. The value will need to exceed the limit for 3 cycles in order to trigger the alert. This is to prevent erroneous readings from causing unnecessary messages.

If you do not have a real sensor,  you can place the alert on the virtual sensor to confirm your code and email configuration is working. In the next post we will look at SMS alerts.

Website – Organisation

Now we have a working controller we need a better user interface to enable us to add sensors, modify zones and perform all of the configuration. The hub website uses Google Charts for graphs, and also employs an Org Chart for the Organisation interface. This is more touch-friendly than a table.

Use the following command to fetch the files required for this feature:

wget -nH --cut-dirs=4 --reject "index.html*" -P /var/www/html/ -i /var/www/html/manifest2.txt http://www.warrensoft.co.uk/home-hub/manifests/website/manifest2.txt

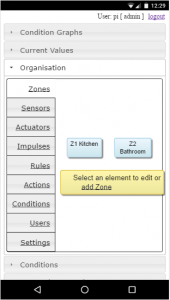
Unlike the controller, the website will dynamically update, so you should be able to login, choose the Organisation menu option and view the Zones, Sensors, etc.

At this point, you may want to create a new temperature sensor and restore the virtual sensor that we hijacked for testing. Within the edit forms there is a Duplicate button for all organisation objects, so it is very easy to clone sensors, actuators, etc.

While we are doing some administration,  we can setup some sensor alerts. This is described in the next post.


Controller – Sensor Software

Fortunately, there is a fantastic library available from Adafruit which interfaces with our temperature sensor. Use the following command to install the necessary pre-requisites…

sudo apt-get install git python-dev python-openssl

and then fetch and install the library.

cd ~
git clone https://github.com/adafruit/Adafruit_Python_DHT.git
cd Adafruit_Python_DHT
sudo python setup.py install

Next we need the sensor helper module for this sensor type, from the project code repository:

wget -P /usr/local/bin/code/controller/sensor_helpers http://www.warrensoft.co.uk/home-hub/code/controller/sensor_helpers/am2302.py

and then we need to make the controller aware of the type by uncommenting the following line in /usr/local/bin/code/controller/sensor_helpers/__init__.py

from sensor_helpers.am2302 import am2302

Stop the current controller thread, and start a new one…

sudo killall python
sudo su - -c /etc/rc.local

and then we are tantalisingly close to taking a measurement. But we haven’t configured the hub to tell it about our sensor, so this is a quick hack to prove our sensor is working. In the next post we will enhance our website with the forms needed to manage all this stuff, like adding sensors, setting up zones and measurands, etc. but I can’t wait that long, so lets use pgAdmin to edit the database and change the existing sensor in the Sensor table.

The inaugural sensor S50 was a virtual sensor. It had an expression in its SensorFunction column rather than details of a real sensor. Save this expression somewhere if you want to restore after the test, and replace it with the following:

am2302.nn.0.2

This is shorthand for:

call the am2302 function with the parameters bcm_pin, channel, sample_count

You will need to replace nn with the bcm pin number that your sensor is connected to. The channel specifies the measurand: 0 for temperature or 1 for relative humidity. The sample_count sets the number of readings which will be simultaneously compared for error detection. Different sensor types will support different parameters as we will see later.

In my development system the sensor function is:

am2302.23.0.2

While editing the sensor, change the MeasurandID from 1 Angle to 2 Temperature. Otherwise the reading will exceed the limits set for the measurand, and an error will occur.

Once you have updated your sensor function and measurand in the database you should be able to visit the Statistics website page and see the temperature reading.

Enough of hacking, let’s sort out the website facilities for editing sensors.
Controller – Current Values

The core function of the controller is to read current values from the sensors, and this is done in the current_values module. In order to make the design extensible, the sensor types are handled by sensor helper modules dropped into the sensor_helpers directory. The __init.py__ file just has to be updated to include the reference to the new sensor type.

The skeleton controller includes one sensor type – evaluate, which enables us to read the virtual sensor described in a previous post. To run the controller, without rebooting the pi, use the following command:

sudo su - -c /etc/rc.local

and inspect the logfile for any errors:

cat /var/log/hub/hub.log

and view the statistics on the website:

http://home-hub/home.php?page=Statistics

You should now see the sensor value changing every minute. It should be tracing out a sine wave, but we will need the graph features in later modules to prove this!  What we should do now is connect up a real sensor.

Controller – Main Loop

The main controller program is main_sched.py. It consists of:

  • a continuous loop which performs periodic routine activities e.g. reading sensors
  • a thread that controls time-sensitive functions e.g. updating timers
  • a thread that does high-priority work e.g. responding to user instruction
  • logging initialisation

This program needs to run when the pi is started, so it is placed in the rc.local script:

sudo nano /etc/rc.local

Add the following between the section that prints the IP Address, and the exit statement:

# Run the Hub Program in a seperate process (&)
cd /usr/local/bin/code/controller
sudo python main_sched.py --log=INFO --slave=false >> hub.log &

Save the file.

The parameters set the logging level and the slave status. This will be our master node, so slave is false.

To assist with the staged implementation of the controller code, as per the project plan, I have commented out a number of lines in the main scheduler with the double hash # #. This enables the controller to run, and future modules to be added later, with their required dependencies.

The following command will fetch the files for this first stage…

wget -nH -x --cut-dirs=3 -P /usr/local/bin/code/controller/ -i /usr/local/bin/code/controller/manifest1.txt http://www.warrensoft.co.uk/home-hub/manifests/controller/manifest1.txt


The next post will cover reading values from sensors.

Website Home Page

Right, let’s get some code for our website. The following wget shell command will fetch the files for a skeleton website from the project’s code repository, and place them in your html web content directory.

wget -r -nH --cut-dirs=4 --reject "index.html*" -P /var/www/html/ -i /var/www/html/manifest1.txt http://www.warrensoft.co.uk/home-hub/manifests/website/manifest1.txt

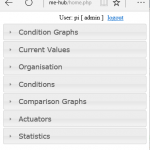
The key files are home.php, login.php, logout.php, signIn.php and auth.inc. A bunch of other javascript scripts and css styles will also be downloaded, which are needed for the website. There is a lot of code in this project, so I won’t go into detail about every file, but essentially home.php provides the menu structure based on the jQuery accordion. This is what you should see if you point your browser to http://home-hub/home.php and login.

login, logout, signIn and auth provide the authentication framework, in conjunction with the Users table in the database. The skeleton database already has the hub user ‘pi’ set up as an administrator, with the password ‘raspberry’ . We can use this login to complete most of the tasks in upcoming posts, but you should change the password as soon as possible!.  Each of the menu items, when selected, reads in the relevant feature file. The only file provided in this first skeleton website download is statistics.php

The Statistics page provides tables of technical data such as sensor values, actuator states, alert states, maximum/minimum values, queued messages and system information. We have implemented this first, so we have a simple view of our sensor values, but there are many other ways to view data which we will implement in later posts.

The skeleton database has one sensor pre-configured, the Sinewave Angle virtual sensor, but as we have no controller software running it is stuck at its last reading.  This is our next task.

Testing – Website Database Access

The website database access will be performed by a shared script, hub_connect.php, in the /var/www/private_html directory. This script has login details, so is placed in a new directory outside of the publicly accessible directory tree.

sudo mkdir /var/www/private_html

give pi ownership over public and private directories…

sudo chown -R pi:pi /var/www/

create file…

cd /var/www/private_html
nano hub_connect.php


<?php

//require the PEAR::MDB2 classes.

require_once 'MDB2.php';

//Makes resultsets into column-name-addressable dictionaries
define("DICTCURSOR", MDB2_FETCHMODE_ASSOC);

//Define some constants
$db_engine = "pgsql";
$db_user = "postgres";
$db_pass = "raspberry";
$db_host = "localhost:5432";
$db_name = "hub";

//Assemble datasource name
$datasource = $db_engine.'://'.$db_user.':'.$db_pass.'@'.$db_host.'/'.$db_name;
//Define connection options
$options = array(
 'debug' => 2,
 'result_buffering' => true,
 'portability' => MDB2_PORTABILITY_NONE
);

$db_object = MDB2::connect($datasource, $options);

if (PEAR::isError($db_object)) {
 die($db_object->getMessage());
}

?>

Now we can test the database access from a PHP script, but first we need to enable Display Errors .

sudo nano /etc/php5/apache2/php.ini

Find the line display_errors = Off and change to display_errors = On. Then restart the apache web server…

sudo service apache2 restart

Place the following script in the /var/www/html directory.

<?php

 //
 // hellodb.php script to show PostgreSQL and PHP working together
 //

 // Required scripts
 require_once '../private_html/hub_connect.php';

 $qry = "SELECT * FROM \"Zone\"";

 $result = $db_object->query($qry);

 if (MDB2::isError($result)) {
   die($result->getMessage());
 }//end db error

 echo "Show me the zones:<br />";
 while ($row = $result->fetchRow(DICTCURSOR)) {
   print $row["ZoneID"].' '.$row["ZoneName"].'<br />';
 }//end while row

?>

Open it with your browser:

http://home-hub/hellodb.php

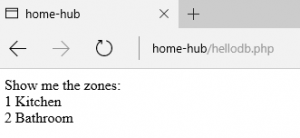
You should see the following output:

Any PHP errors will be logged in the following location:

/var/log/apache2/error.log

This completes the setup of the core hub components. In the next post we will consider the plan for the remaining parts of the project.

Website – Install Apache

Use the following to install apache:

sudo apt-get install apache2

Add the following to your samba configuration, if you want to manage the website from your desktop, and restart samba:

[www] comment = /var/www on Raspberry Pi
path = /var/www
writeable = yes
guest ok = no

sudo /etc/init.d/samba restart

Give the pi user access:

sudo chown -R pi:pi /var/www/html

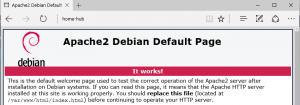
Confirm that you can browse to your website    http://home-hub

and create and edit files in the html document root.

The next task is to install PHP, PEAR, MDB2 and MDB2 pgsql.

sudo apt-get install php5 libapache2-mod-php5 php-pear php5-pgsql
sudo pear install MDB2
sudo pear install pear/MDB2#pgsql

The best way to check that PHP is correctly installed is to create a small script, info.php, that runs the phpinfo() function and place it in the var/www/html directory.

<?php

 // Show all information
 phpinfo();

?>

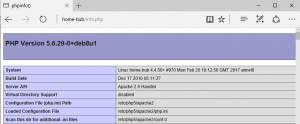
Browse to this page and if PHP is working you will see a long list of details about the installation.

If all that checks out we can move on to testing database access from our website.

Software – Hub Database

Now we have a working database server, we can create and populate the hub database itself.

This is the first of a number of commands that use wget to download files from the project repository.

cd ~
wget http://warrensoft.co.uk/home-hub/database/scripts/hub-skeleton.sql
psql -h localhost -U postgres -d postgres -f hub-skeleton.sql

After confirming your postgres password you should have a hub database containing 16 tables (some populated with basic data), plus a number of supporting views and functions.  We will examine this schema in the next post.